|
| |
Index
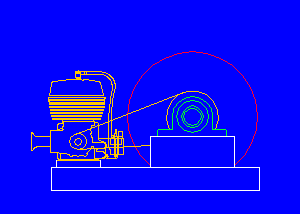
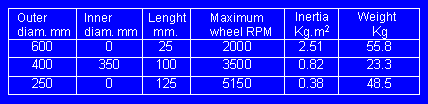
Description of the dynamometer.it is a robust metallic frame on which all the components mount. The fundamental element of the dynamometer is the axis, in which has mounted the inertial wheel, the brake, the starting gear tooth and the chain wheel that will connect the engine with the axis. No clutch between the motor and the inertial wheel exist. Clutches are expensive and complicated to mount, the design of this dynamometer has optimized so that clutch are not necessary. Clutches are used to disconnect the inertial wheel of the rest of the assembly during the starting, and to disconnect the engine of the assembly when finalizing the test so that inertial wheel does not drag the engine to high revolutions while it brake and with the carburetor closed and its consequent problems of lubrication (it remembers that oil enters with gasoline). Reducing inertia of the inertial wheel then the starter engine is able to accelerate the assembly. This reduction of inertia is compensated with an increase of wheel revolutions. With a big automotive air cooler disk brake is possible to reduce the speed of the assembly in few seconds so that it is not dangerous for the engine. The fact to have a inertial wheel with a reduced inertia and that it turns to hi revolutions allows us to stop it in a short time. Design of the inertial wheelFor the design of the inertia wheel we can play with the external diameter, the internal diameter, length and revolutions. Our objective, as it has been said in the previous section, is a inertial wheel with relatively little inertia and therefore a compact and light design so that it allows us to work at hi revolutions without danger. It happens a double benefit, when we fixed a greater objective of inertia wheel revolutions, if we had the same torque applied to the wheel would cost more time to increase same engine rpm, nevertheless when fixing superior revolutions to the wheel we must mount longger ration engine-inertial wheel reason why smaller torque is applied to the wheel. The result is that a small increase of revolutions provides a greater time in the test, this is verified doing calculations: the time of test when the wheel get 1000 maximum rpm with the engine since 2000 rpm to 12000 is of 0,8 seg. for 2000 wheel rpm is of 3,2 and for 4000 wheel rpm seg is of 13,0 seconds. We must arrive at a commitment, for which we will make a table with wheels of different sizes and a common characteristic: an ideal engine of constant torque and 15 cv (12000rpm) expend exactly 10 seg. in arriving at the wheel revolutions marked in the table.
400 mm wheel is smaller that first and weighs half less, reason why it is logical that this wheel allows increase rpm since 1500 to 3500 rpm. The wheel that we have chosen is a hollow pipe reason why it will be necessary to compose an axis from welded pieces. Electric starter is able to drag the inertia wheel without problems. Construction plansClick here to go to Download page Used bearings:
Go to topInstallation of sensorsThe only sensor which we must mount to obtain the pair and power of the engine is the wheel speed sensor, we will mount pick-up type sensor, this sensor generates an impulse whenever it passes a ferromagnetic body in front of his zone of sensitivity. We will put a single mark by return, for it we drilled the wheel in a lateral face and nailed a projection that excels 10 mm. If we mounted a starting gear tooth we could take advantage of generate an impulse with each passage of tooth. Go to topData acquisition and SoftwareOnce we have the finished mechanical part we needed to acquire data and to process them to obtain the curves. For it we will use SmartPower SP-1. Go to topDoing the first test[Go to examples tests made with SmartPower SP-1] Go to topinfo@sportdevices.com to contact SportDevices.com |